Friday 6 February 2009
Establishing Shot Render Test
Here is the final matte projection of the first Establishing shot. I intend to add some more moving cloud elements and some interactive cloud shadows on the foreground mountain. However, with time being short, I may not be able to make all those changes, so I rendered this shot off at this stage that i would feel relatively happy leaving the shot in its current state in the final trailer:
Establishing Shot Matte Painting
Here is the final Matte Painting for the shot. I used many different photo references along with a large amount of hand painting to produce the final look here. Some things such as the cloud shadows and volumetric light effects will have to be turned off again before doing the projection of this shot as i ultimately would like moving cloud shadows in the final shot
A few elements have changed as I felt that they would work better in the final shot done differently:
A few elements have changed as I felt that they would work better in the final shot done differently:

Extension of Establishing shot sketch
I decided on this shot to extend and break down the original sketch, and do a camera projection in Maya to rough out the camera move that I intend this shot to use. Here is the extended sketch, and the 3d camera projection mapping test that i produced using the sketch:
Sketch:
Sketch:

Projection Mapping Test:
This quick test should help me to work out any problems that i may encounter when doing the final 2.5D matte painting, and therefore enables me to prepare for them, or eliminate them before they can occur.
Will update soon with the Matte Painting
New concept for opening shot
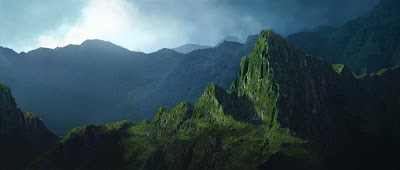
As a small break from my work on the previous matte painting, i decided to paint up a quick sketch just for fun. As tends to be the way with these things, i ended up liking the sketch, which is based on reference from Machu Picchu, and now intend to use something like this as the opening establishing shot of my trailer, rather than the idea i had sketched out before. This is quite different to how i had originally envisioned the shot, but i feel that it will work better as an overall shot than the previous sketch i produced (which i was never completely satisfied with).
So here is the new sketch for that shot, and a first look at the new direction i will be going with this shot:

Friday 16 January 2009
Start of Next Matte...
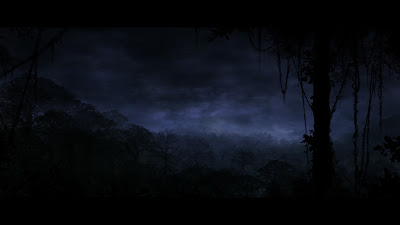
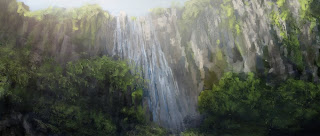
Well, i have rumaged through my plate shots from New Forest again and picked out the next environment that i want to work on from them. This one will be more difficult than the first as the harsh backlighting will mean that i cannot get away with using photographic elements without a lot of relighting work. It should be an interesting challenge though.
Here is the plate, and a sketch to get down my initial thoughts for the matte painting. I may change direction completely with the placement of elements, but the general atmosphere of this sketch is something i want to try and maintain, regardless of the direction the matte painting goes in:
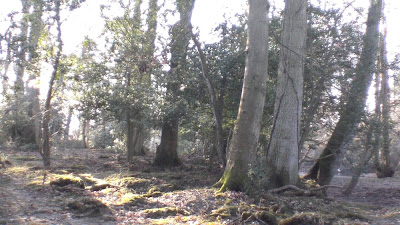
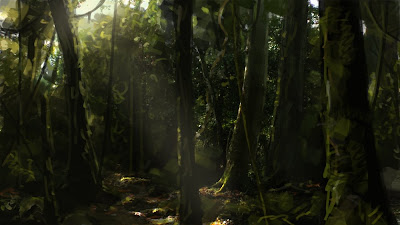
Here is the plate, and a sketch to get down my initial thoughts for the matte painting. I may change direction completely with the placement of elements, but the general atmosphere of this sketch is something i want to try and maintain, regardless of the direction the matte painting goes in:
Plate:

Sketch:

Thursday 15 January 2009
Promotional Image
Here is a promotional image produced for the trailer. It is based on the last matte painting shot that i have modified to show the creative process and applied the test to make the promo image. Only did this because it was needed for the Expotees, but might use it for other things like the front page of my project bible etc.

Finished River Matte Painting
Well, here is a Vimeo link to the shot in a pretty much completed state. Based on some feedback, i am going to slightly adjust the water reflections and i may make the mist a little less thick. For now though, this is the final shot:
Final Shot Render
Will be making a start on the next shot tomorrow, which is quite similar. More updates soon!
Final Shot Render
Will be making a start on the next shot tomorrow, which is quite similar. More updates soon!
Wednesday 14 January 2009
River Matte Painting
Here is an update on the first matte painting that i am working on utilising the plates shot in the New Forest. The final shot is very nearly complete. All that is left to do is to add some low lying mist gently rolling along the surface of the water. This should help add more of a tropical atmosphere to the final shot, and be the final touch in shifting the environment away from the British setting that still sits there underneath all the matte painting. I ended up primarily just keeping the water and banking from the plate, along with one foreground tree, and the rest of the shot has been either heavily repainted or completely replaced. Given a little more time, there are still some changes that i would have liked to have made to finesse the shot a little more, but in general I am fairly happy with this now, and i must press on with the next similar shot.
These images show a frame from the nearly finalised shot, and a comparison frame of the shot before the work began i.e. the plate exactly as it was filmed in Hampshire.
Matte Painting:
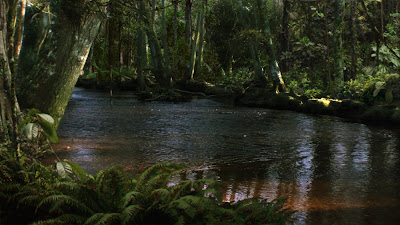
Plate:
I will be making a start on the next shot now, so more updates should come soon!
These images show a frame from the nearly finalised shot, and a comparison frame of the shot before the work began i.e. the plate exactly as it was filmed in Hampshire.
Matte Painting:

Plate:

Here is a 'work in progress' render of the shot, before i have added the final pieces mentioned above. I apologise if this appears a little dark, Vimeo's compression seems to darken the videos considerably:
I will be making a start on the next shot now, so more updates should come soon!
New Year Update
Well, its been a while since i updated here, but i have not been idle. Over Christmas I did some shooting at the New Forest in Hampshire. The plates that i shot there were pretty bare; very little vegetation around when shooting in the heart of a British winter. However, the matte paintings are now underway to turn these plates into the tropical jungles required for the project.
I will update a little later with some progress images, but so far the work is moving swiftly, so the first of these smaller shots should be hopefully completed soon.
I will update a little later with some progress images, but so far the work is moving swiftly, so the first of these smaller shots should be hopefully completed soon.
Sunday 30 November 2008
This was a bit of a sidetrack from what i should be doing, but after all the inspiration i got from the Studio AKA lecture, i just had to try doing some different paintings. I considered doing my new storyboards in this fashion, but these just take a little more time than i intend to spend on the storyboards. I think my time would be better spent quickly getting the new storyboards together and focusing on the large amount of matte painting work i have ahead.
These are just a bit of fun before i get fully stuck back into the storyboards again. I must admit, i really didnt want to go back to storyboards, but i think it will be for the best in the long run.
These are just a bit of fun before i get fully stuck back into the storyboards again. I must admit, i really didnt want to go back to storyboards, but i think it will be for the best in the long run.

Direction Change
Well, after the great advice given to me by Andy Staveley from Studio AKA at Fridays university visit, i decided to completely change the direction I was going with this piece. I have now decided to make the trailer much more of a teaser, and not really show the actors much at all. This will give me the chance to focus more on the environments, and simultaneously eliminate all the problems involved with shooting multiple actors at multiple different locations up and down the country.
I am now working on a new set of storyboards and will update soon with a fresh animatic. Stay tuned...
I am now working on a new set of storyboards and will update soon with a fresh animatic. Stay tuned...
Overpainted Frame
Here is one of the frame that was graded, with a bit more vegetation and growth very roughtly painted into the environment to add more of a jungle feel to it. Not long spent on this, just trying to see how easy or difficult it will be to add more of a tropical feel to a shot.


Thursday 27 November 2008
Grading Tests
Here are some tests into how much a colour grade can affect the overall atmosphere of stock film / photography. A big consideration for this project will be getting the location shooting to feel as tropical as possible whilst shooting through a UK winter.


Although there is no specific point that the intended location is mentioned in the trailer, the aesthetic that i am aiming for is something resembling a rainforest. In close up shots, the depth of field will help to hide the fact that the locations are not a real rainforest, and in the very wide shots that are mostly digital, i will have the freedom to make the setting as lush or as sparse as i choose. The main problem area will be mid length shots.
I intend to do a certain amount of matte painting to help add more vegetation to the shots, and will add fog to give more atmosphere, but these tests are just about how much difference simply shifting the colour of the shot can make to the feel of the environment. I also simulated a rough depth of field effect to mirror what i expect the camera to be doing on the day.
Shot 1, Before:

Shot 1, After:

Shot 2, Before:

Shot 2, After:

Shot 3, Before:

Shot 3, After:

Shot 3 does have some rudimentary matte painting in the fact that i quickly sketched out the overexposed sky, but other than that, these tests are all just colour tests.
Wednesday 26 November 2008
Opening Shot Sketch
Working on the next shot now, another all digital shot, this time the very first opening shot of the trailer (as can be seen in the animatic). The colour pallette was the main issue in this one. I wanted quite a dramatic sky, but without all the land elements falling into complete silhouette. Struggled around with it for a bit before settling on this. Ill start breaking this up into its layers and do a test projection of the sketch just the make sure that the shot works before doing the full photoreal matte painting.

Sunday 23 November 2008
First Completed Shot
So here is my first comepleted shot for the project. The reason this shot came first is because I had all the details worked out in my head already, and as it was an entirely digital shot, it did not require going out to shoot any plates.
I included the initial sketch i did for this shot too. Just a very brief sketch in photoshop to work out the composition and make sure i really did know what i wanted. Just a 15 minute rough out that i could work the matte painting on top of basically.
After Effects was used to composite all the final matte elements together, add lightning, add some low rolling mist and for adding the breeze in the trees. The camera move was also added in After Effects, and is just a 2D camera move, kept subtle so as not to destroy the illusion.
I have rendered this as a 4 second shot, as that is what i have worked on it as, but this shot will only last approximately 1 second in the final production (check the animatic, about two thirds of the way in). I may make some minor tweaks before i cut this into the final production, but for now, im calling this one done.

Due to the dark nature of the shot and the compression that it recieves when being uploaded to this blog, i have set up a Vimeo account to post videos instead. Here is the link to the video:
This much closer represents what the uncompressed shot looks like, although still some detail is lost and the values a little flattened...
Saturday 22 November 2008
Animatic 01
Here is the first finished animatic for the project. Its a little hard to read as the drawings are very rough and the narrative is broken and mixed up as it is more important to have high impact in the trailer than easy to follow narrative. Some of the timing still needs tweking in places.
This is all still subject to change, including the text, but is close enough to the way i want to put the final trailer together. I felt it was important to work out the trailer, not because the narrative had to be strong, but because the timing is so important in delivering tension. Also, being on a shoestring budget and with limited time, i did not want to be shooting footage that will end up on the cutting room floor. I may post revisions of this as i start getting shots finished and cut them into the animatic.
This is all still subject to change, including the text, but is close enough to the way i want to put the final trailer together. I felt it was important to work out the trailer, not because the narrative had to be strong, but because the timing is so important in delivering tension. Also, being on a shoestring budget and with limited time, i did not want to be shooting footage that will end up on the cutting room floor. I may post revisions of this as i start getting shots finished and cut them into the animatic.
Wednesday 22 October 2008
Test Shooting
I decided to do some shot tests with the cameras that i will be using for shooting my project. This is just one of many done over the past few days, and was a test of the depth of field (DOF) capabilities.
The camera used in this test is the Panasonic AG HPX-500. This is the studio based camera that will be used for any green screen work, but possibly for location shooting as well, and retails at $14,000.00
The other camera that will be used for location shoots is the Panasonic AG HVX-200, which is the camera that was used to shoot some of the movie Cloverfield, which required a handheld look to the footage. This camera retails at around $5,000.00
In case there is any interest, this shot was wide open at F1.8, a 35mm focal length, low lighting to avoid overexposing, and the cone in the shot was approximately 30" from the cameras focal plane. Unfortunately this is a very small sample, and has been compressed 3 times by the time it is seen here, but hopefully it still gives some impression of the shallow DOF achievable with these cameras.
Sunday 12 October 2008
Conceptual Work
Here are a few concept paintings for the project. All environments at the moment as that is the main priority for the project. Character designs to come soon though. These are really just lighting and mood explorations. All done in Photoshop.


Friday 10 October 2008
Uncharted Podcast 01
.
Uncharted Podcast 01
To listen to this podcast, you can either click the link above and wait for it to load, or right-click the link and choose 'save as' or 'save target as'.
Running Length: 4:50
Uncharted Podcast 01
To listen to this podcast, you can either click the link above and wait for it to load, or right-click the link and choose 'save as' or 'save target as'.
Running Length: 4:50
Subscribe to:
Posts (Atom)
